You have plenty of reasons for wanting to use a virtual private network (VPN) on your Mac. They include browsing safely on public Wi-Fi, hiding your location, accessing region-locked content, and keeping your file sharing habits to yourself.
Setting up a VPN on your Mac is easy. macOS has built-in support, and some VPN services provide their own hassle-free software. You can also install third-party tools for using different protocols.
Method 1: Use Your VPN Provider’s Software

Depending on your VPN provider (check out our best VPN services), they may provide access to software that allows you to use the service. This software is tailored to your provider. Thus, you don’t have to mess around with configuring your connections, inputting IP addresses, or checking which protocols you can use.
Most VPN providers provide this software for Mac and Windows users. Linux users will likely need to set up your VPN on their own. Using provider software is a simple case of downloading and installing the client, logging in with your username and password, then connecting to a server of your choice.
Provider software makes it easy to jump around from server to server, since the software keeps a list of available connections. If you’re using your VPN to access region-locked content, this makes it easy to pick a server to connect to. Some providers have specific servers that are compatible with BitTorrent traffic. The software makes it easy to make sure you don’t fall foul of the rules.
Method 2: Use Apple’s Networking Tools
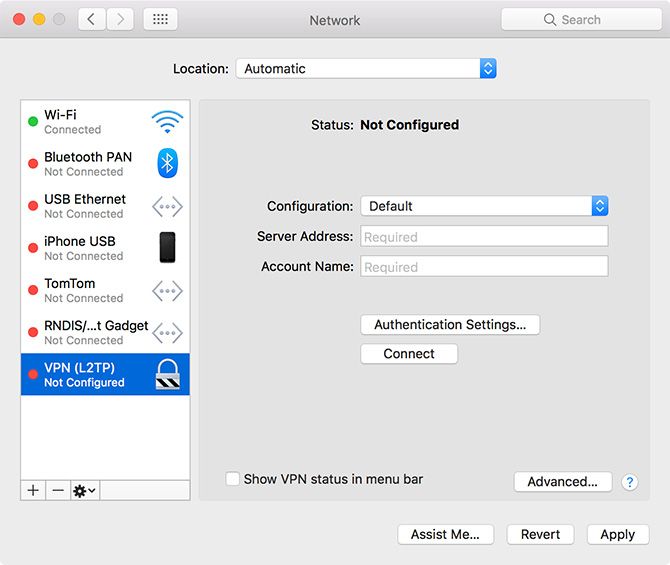
macOS has built-in support for creating VPN connections as part of Apple’s own networking tools. You can access these by heading to System Preferences > Network, then clicking on the Plus button.
From here you can specify a VPN connection, pick the VPN type (protocol), and give your new VPN connection a name. It pays to be descriptive when naming your connection if you intend to use more than one VPN server. For example, you might plan to access region-locked content in other countries.

macOS includes support for L2TP (Layer 2 Tunneling Protocol) over IPSec, Cisco IPSec, and the newer IKEv2 (internet Key Exchange version 2) protocol when setting up a VPN. L2TP is considered reasonably secure, though the protocol itself provides no protection. Instead it uses the IPSec secure network protocol, which is still relied upon by millions of VPN users every day.
IKEv2 is a more modern choice of protocol, favored for its ability to quickly reestablish a VPN connection in case of network dropout. Like L2TP, it also uses IPSec for encryption, though it’s still favored by many over L2TP for its speed.
Apple’s desktop OS used to support PPTP (Point-to-Point Tunneling Protocol). This is a much older and more vulnerable protocol that was once favored by corporate networks but has since fallen by the wayside. If you want to create a PPTP connection, you’ll need to use a third-party app (like Shimo) to do so. But you should avoid this unless it’s necessary.
So which protocol should you use? That depends on which protocols your VPN provider provides access to. You should always avoid PPTP where possible, with L2TP and IKEv2 providing a passable level of security. But if you want an even more secure VPN connection…
Method 3: Use Third-Party VPN Software
Two other VPN protocols exist that aren’t supported out-of-the-box within macOS: SSTP (Secure Socket Tunneling Protocol) and OpenVPN.
SSTP is a proprietary standard which mostly only works with Windows, since it’s owned by Microsoft. SSTP uses closed-source SSL 3.0 encryption, which is why it’s considered highly secure (even though the code isn’t open to inspection).
OpenVPN, as the name may suggest, is a fully open source technology based on OpenSSL. This means the code is freely available for anyone to inspect. It supports AES (Advanced Encryption Standard). This open approach is often lauded a a proof-of-concept for stress-testing technology against outside attack.
Both of these standards are more secure than any included with macOS. It’s possible for VPN provider software to use either, so you might already use OpenVPN or SSTP and not even realize. But if you want greater control over your VPN setup, try one of the following apps.
We’ve recommended other free and open source macOS VPN clients if you need more options.
OpenVPN: Tunnelblick

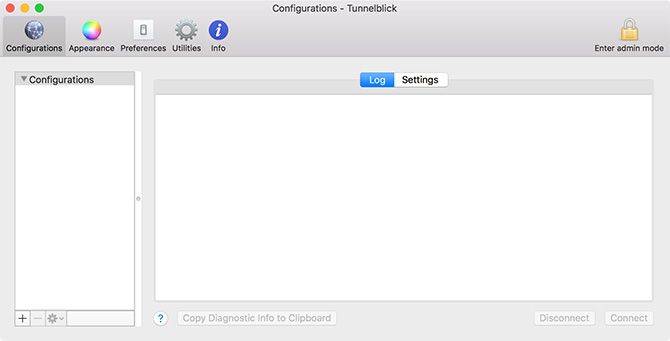
If you want to use OpenVPN on your Mac, Tunnelblick is the best tool for the job. It’s free, open source, and provides an easy-to-manage GUI for connecting your Mac via OpenVPN. You can add a long list of connections using downloadable configuration files, then select different servers using the main client or menu bar icon.
Download: Tunnelblick (Free)
SSTP: sstp-client
While SSTP is a Windows technology, it’s possible to connect to an SSTP server using macOS or Linux with sstp-client. The macOS version of this client depends on the Macports project; the easiest way to install it is using Mac command line package manager Homebrew.
Download: sstp-client (Free)
Which VPN Solution Should You Use?
Your VPN provider will likely recommend you use their own client, which makes connecting and managing your VPN connections easy. If you want to use your own client, you’ll need to make sure the connection you make is compatible with your chosen VPN protocol.
When given the choice, OpenVPN provides better security than L2TP or IKEv2. You should always endeavor to keep your VPN client updated, since security issues can and do arise (and often receive patches quickly).
Another option is to install a VPN connection on your router. This allows you to manage your connection for the entire network, ideal if you’re connecting to a local VPN strictly for security purposes.
Read the full article: How to Set Up a VPN on Your Mac
from MakeUseOf https://ift.tt/2AeOj1Z
via IFTTT

0 comments: