Everyone knows how about the Windows “look”, but what if you’re feeling a bit tired of seeing the same old thing each time you switch on your computer?
Windows 10 and the earlier Windows 7 each have good options for tweaking the login screen. Here’s how to access those options and configure the login screen to look just how you want.
Customize the Login Screen on Windows 10
You have two options for customizing the Windows 10 login screen: the message, and the background.
Change the Windows 10 Login Screen Message
Whether you use a desktop, laptop, or even a Surface-like tablet, it’s possible to set a custom login screen message. This has various uses, from delivering a corporate message, to making the end user smile. It might also be useful if your device goes missing, displaying your address to the finder.
Note that the actual login screen itself will remain unchanged. Rather, a new screen will be displayed, with an OK prompt, before the login screen.
Start by opening the Registry Editor by pressing WIN+R and typing regedit. Click OK, then browse the left-hand pane for HKEY_LOCAL_MACHINE. Expand this entry, following the path Software\Microsoft\Windows\Current Version\Policies\System.
Under System, in the right-hand pane, you should see a registry item, legalnoticecaption. Right-click this and select Modify, and under Value Data input a heading for your new message. Some sort of hail, or attention-grabbing phrase, should do.
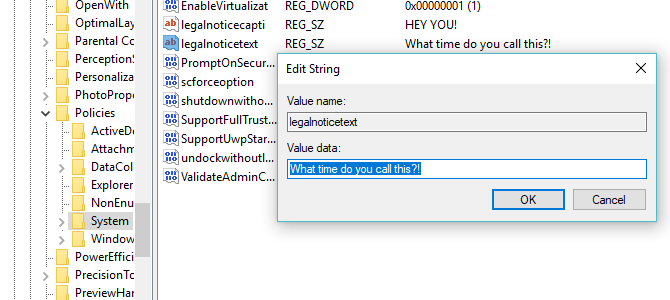
Next, find legalnoticetext. Again, right-click to Modify, this time entering into Value Data a more detailed message.
This might be something like “Log in to access the ACME Plc network” or “If found, please return to…” Ultimately, it needs to be a message that serves some sort of purpose, otherwise there’s not much point in changing anything!
With the message input, click OK to confirm, then exit the Windows Registry. Next, restart Windows to apply the registry tweak.
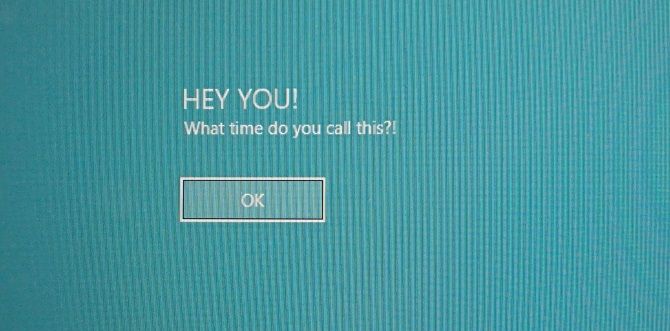
Your new Windows 10 login message should be displayed! You’ll need to click OK to reach the login screen.
It isn’t only this message you can tweak from the Windows Registry. Here are five more registry tweaks you can make in Windows 10.
Add a New Windows 10 Login Screen Background
In addition to the login screen message, you can also change the background.
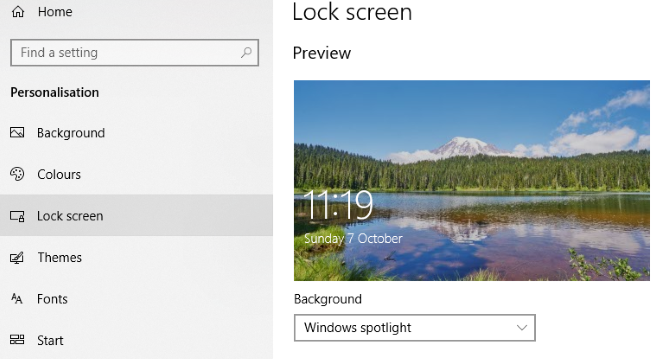
Hit WIN+I to open the Settings screen and select Personalization > Lock Screen. Find the Background drop-down menu and select between Windows spotlight (images from Microsoft), Picture, and Slideshow. The latter two options let you select images from your own library.
Now, as this new image is specifically for the lock screen at this stage, you’ll also need to ensure the Show lock screen background picture on the sign-on screen option is switched to On. Otherwise, the lock screen with display a different image, or remain blank. Once you’re done, close the Settings screen. (Check our full guide to the Windows 10 Settings menu for more.)
Again, you should sign out of Windows to check that the tweak has been applied. If all has gone to plan, you should have a new Windows 10 lock screen background and accompanying message!
Unfortunately, that’s as far as you can go in Windows 10. Tweaks are limited to the login screen message and background; you cannot change the font. However, other Windows 10 tweaks are available, such as switching the desktop wallpaper to an animated background.
Customize the Windows 7 Login Screen
While tweaks are limited on Windows 10, things are a bit more generous on Windows 7. Here, you can customize the login screen message, as well as the login screen font.
Change the Windows 7 Login Screen Message
Intended for Windows 7 32-bit or 64-bit computers with Service Pack 1 installed, the following can be done with or without User Account Control active. You will also need a copy of Resource Hacker, a free tool designed to enable you to modify, add, rename, delete and view resources in Windows EXE files.
While this is downloading, open C:\Windows\System32\en-US\ (note that non-English versions of Windows will have a different folder name, such as \es-ES\ for Spanish) and find winlogon.exe.mui.
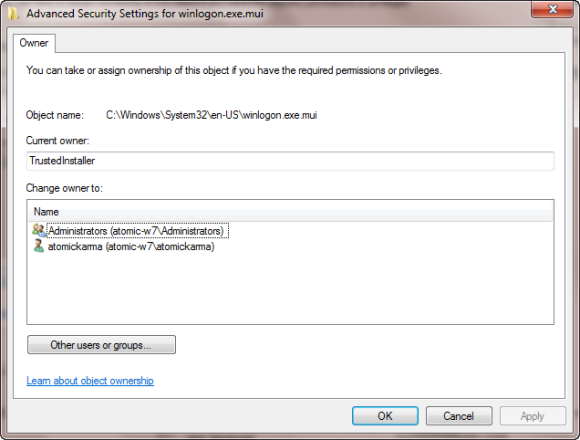
Right-click this file and select Properties > Security > Advanced > Owner.
In this window, click Edit and then under Change owner to, select your own login name and click Apply. Click OK to proceed and select OK to exit these windows and the original Properties box.
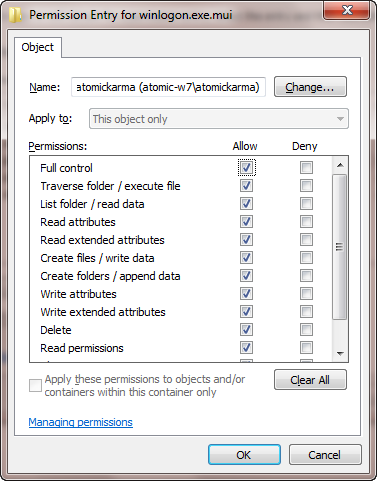
Once done, return to Properties > Security and select Edit. In the following box, click Add and search for your login name; it should resolve as PCNAME\USERNAME.
Select this, click OK to add the login, and you will be returned to the Security tab. From here, click Advanced > Permissions > Change Permissions, and under Permission Entries select the newly added entry and click Edit.
Select the Full Control checkbox in the Allow column, then click OK, and then Apply to exit.
You should then copy the winlogon.exe.mui to a new location, preferably your desktop.
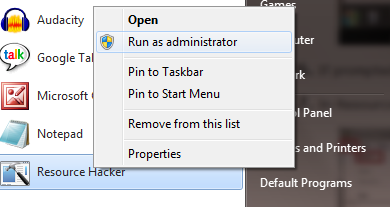
Next, install Resource Hacker and launch the software from the Windows Start menu by right-clicking and selecting Run as Administrator.
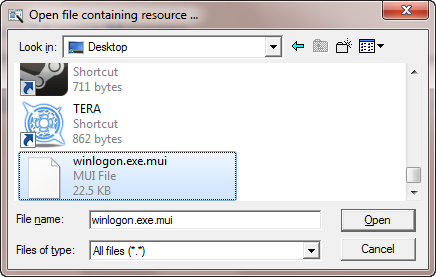
Agree to the UAC notice and when the application has loaded open File > Open.In the Files of type box select All files (*.*), browse to the desktop and load winlogon.exe.mui into Resource Hacker.
You will see that the tool has a similar interface to the Windows Registry Editor, so expand String Table > 63 > 1033 and in the right pane update the entries in quotes on lines 1002 and 1005—this will be your new Windows 7 login screen message!
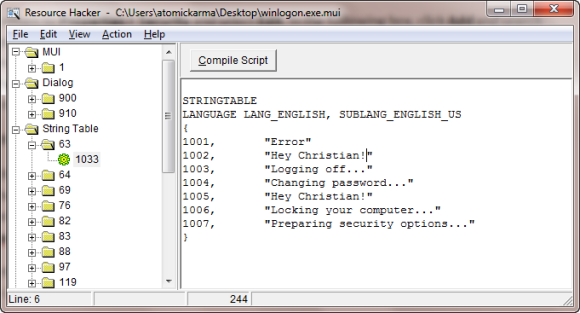
Ensure the quotes remain in place, and click Compile Script then File > Save to complete the process.
Close Resource Hacker and copy the winlogon.exe.mui file back to C:\Windows\System32\en-US\ (choosing Copy and Replace). Open Start and type CMD, right-clicking the resulting command prompt icon and selecting Run as administrator.

Type mcbuilder and tap Enter, then wait until the process is complete (the cursor will flash on a new line).
When done, type exit and tap Enter to close the command prompt.
You’ll need to restart Windows to complete the process and confirm your changes.
To undo this and restore the original message, simply start the process again, replacing your custom message with “Welcome”.
Alternatively, delete winlogon.exe.mui and replace it with the winlogon.exe_original.mui file created by Resource Hacker, making sure to give it the old filename.
Select a New Windows 7 Login Screen Font
While changing the login screen message might take a while, changing the font is much quicker.
Open Start and type regedit, tapping Enter to launch the utility and agreeing to any UAC prompts (before proceeding use File > Export to make a backup of your Windows Registry—useful if an error is made).
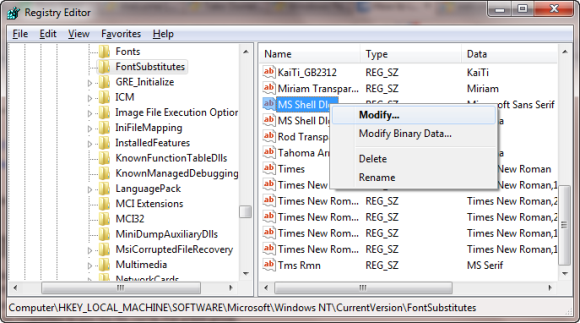
Expand the path HKEY_LOCAL_MACHINE\SOFTWARE\Microsoft\Windows NT\CurrentVersion\FontSubstitutes and find MS Shell Dlg in the right pane#
Right click on this and select Modify.
In the resulting box, input the name of the font you wish to use (check C:\Windows\Fonts for a list of currently installed choices), and repeat for the entry MS Shell Dlg 2 (note that the default option is Tahoma).
Once this is done, close the Windows registry and restart your computer to apply the changes. (While you can also logoff and login, locking your computer will not display the new font.)
The Login Text Is Too Light/Dark!
Changing the color of the Windows login screen font isn’t possible.
However, you can change the weight of the text—that is, how prominent it appears in front of your chosen background.
To do this, return to the Windows Registry Editor and expand the path HKLM\SOFTWARE\Microsoft\Windows\CurrentVersion\Authentication\LoginUI.
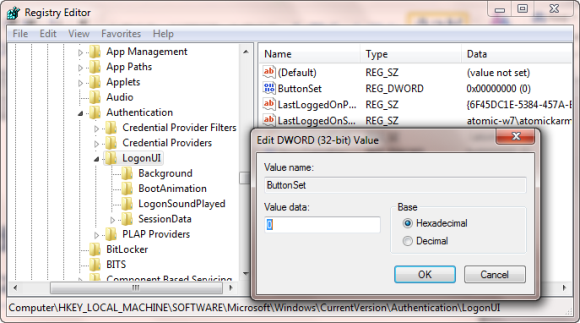
In the right-hand pane, right-click some empty space, and select New > DWORD, naming it ButtonSet.
Once this is done, double click to edit the value, clicking OK when you’re done. You have a choice of the following:
0: This gives lighter text shadows, darker buttons and is the default choice.
1: Suitable for lighter backgrounds, this option offers darker text shadows and lighter buttons.
2: Intended for a darker background, text shadows are removed, and buttons are opaque.
When your choice is made, close Registry Editor and restart Windows to check the results.
Change Your Windows Login Screen!
We’ve looked at login screen tweaks for two versions of Windows, those that are currently most popular: Windows 7, and Windows 10.
To recap, if you want to tweak the Windows 10 login screen, you must:
- Open the Windows Registry
- Expand HKEY_LOCAL_MACHINE. Expand this entry, following the path Software / Microsoft / Windows / Current Version / Policies / System
- Right-click legalnoticecaption, select Modify, and under Value Data input your new message.
For tweaks to the Windows 7 login screen, meanwhile, you can:
- Change the login screen message
- Change the login screen font
- Adjust the weight of the text, making it lighter or darker
Although third party software and changes to the Windows Registry are required to make these customizations, the results can be impressive, especially when combined with a custom login screen background.
Looking for more Windows tweaks? Here are six tools for tweaking the Windows 10 Start menu.
Read the full article: How to Change the Windows Login Screen Message and Font
from MakeUseOf https://ift.tt/2AaYJzm
via IFTTT

0 comments: