
Working in Photoshop can be time-consuming, but there are a few tips and tricks you can use to speed up your workflow. This will ensure that you spend your time being creative, rather than wasting time doing things the long winded way.
1. Clone Photoshop Layer Styles
You’ve spent a ton of time perfecting your design using Photoshop’s layers and styles. Instead of painstakingly applying the same styles to a new layer or design, you can “copy and paste” the styles.
To access Layer Styles, right-click the layer and select Blending Options. You can add outlines to your Photoshop designs, along with drop shadows, bevels, and strokes.
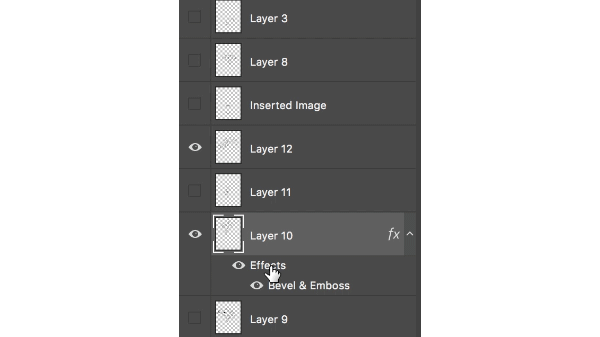
To quickly copy one layer style to another, right-click the layer with the styles applied and click Copy Layer Style.
Click on the layer where you want to apply the styles. Right-click the layer and select Paste Layer Style.
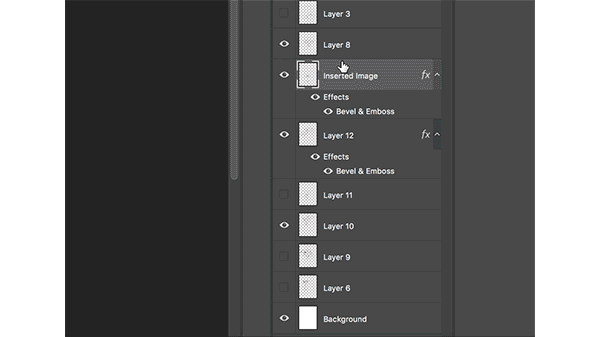
You can also drag and drop the layer style in the layers panel, but this will remove it from the original layer.
2. Batch Resize Images
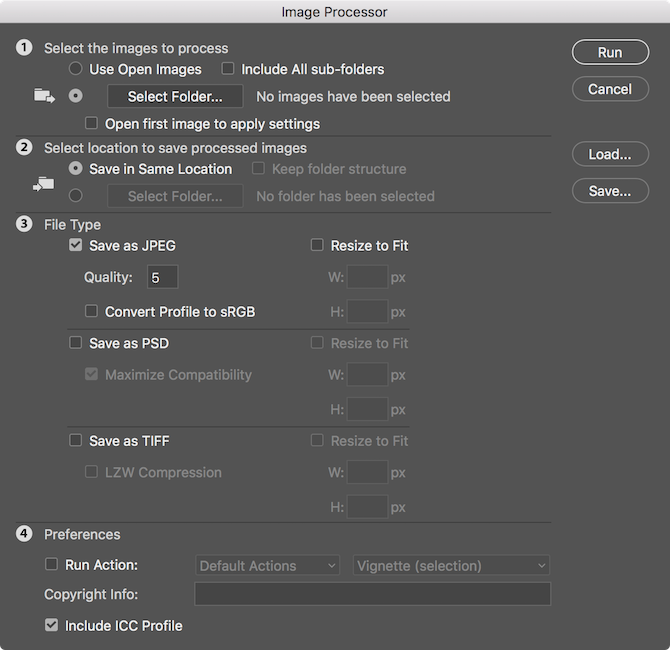
You can easily resize a large batch of photos in Photoshop using a script. (Don’t worry, it’s not as intimidating as it sounds.)
Go to File > Scripts > Image Processor, and you’ll find a few options available. You can run the script on images that you currently have open in Photoshop or better yet, you can apply the settings to an entire folder of images.
You can also select the location on your computer to save the resized images, the file type (jpeg, PSD, or TIFF), and the quality.
Once you’ve selected your file type, you can now select your image size by checking Resize to Fit. You can select a specific width or height, depending on your needs.
Once you’ve made your selections, click Run.
3. Quickly Select a Photoshop Layer
If you’re working with a ton of layers, it can be tedious scrolling to find the exact one you’re looking for.
There are a few faster ways to get straight to the layer(s) you want to adjust without touching the layers panel.
- Select the Move tool from the Tools menu or use the keyboard shortcut V
- In the menu at the top of the screen, make sure Auto-Select is checked and that Layer is selected from the drop-down menu.
- Click on the item in your canvas that you want to select and it should now be the selected, active layer in the Layers panel.
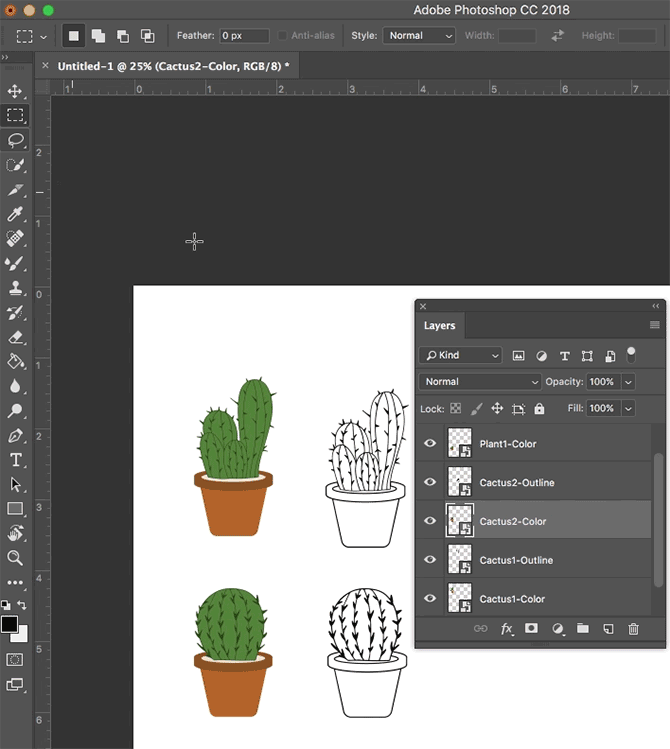
You can also use this feature to quickly select Groups by choosing Groups from the Auto-Select drop-down menu.
There’s another option. With the Move tool selected, press the Ctrl/Cmd button on your keyboard and then click the layer you want to select.
If you have a crowded canvas, you can get more specific with the following:
- With any tool selected, use the Ctrl+Cmd+Right click combination to bring up a menu panel. (Make sure that you’re clicking in the area where the item you want to select is on the canvas.)
- Click on the name of the layer you want to select.
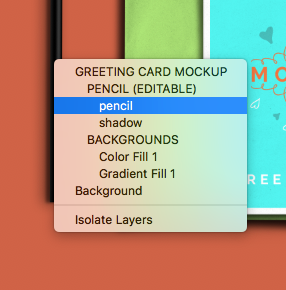
If you want to select all of the layers at the same time use the keyboard shortcut Command+Option+A on a Mac or Ctrl+Alt+A on Windows or go to Select > All Layers.
4. Zoom In and Out Simultaneously
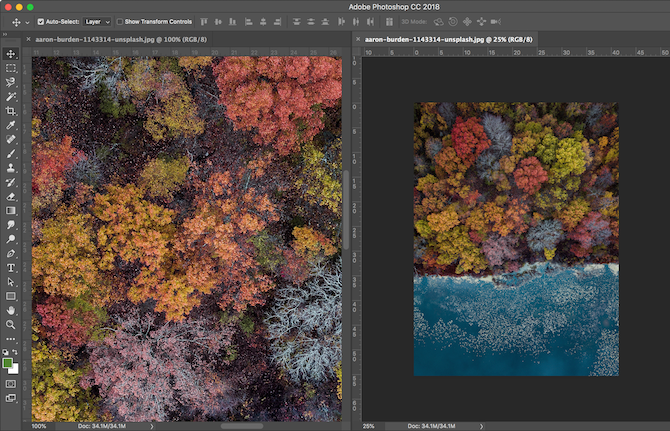
If you’re working on an image, it can be helpful to see a closeup at the same time as the entire image. This means you can make small edits in a detailed view, and see how they affect the overall image at the same time.
To view a zoomed and 1:1 version of the image simultaneously, do the following:
- Go to Window > Arrange > New Window for [FileName.PSD]. This will open a second version of your image in a second tab.
- Go to Window > Arrange > 2-up Vertical to display both canvases side by side.
- With one of the canvases selected, zoom in. (You can easily zoom in and out using the keyboard shortcut Cmd/Ctrl+ and Cmd/Ctrl-.)
5. Automate Using Actions and Scripts
There are plenty of ways to automate your work in Photoshop using a combination of actions and scripts.
Photoshop Actions cut your editing time by allowing you to apply the same editing techniques to your photos or images with the click of a button.
You can download Photoshop Actions or you create your own Actions for your personalized editing style. You can use also Actions for repetitive tasks like adding watermarks to your images or creating diptychs and triptychs.
And as we’ve mentioned, you can use Photoshop Scripts to automate repetitive tasks like batch resizing images.
In addition to Actions and Scripts, you can also use Photoshop filters for quick work. For example, filters make it easy to quickly add realistic trees to your Photoshop designs.
6. Create Custom Photoshop Shortcuts
You can create custom shortcuts and workspaces that suit your workflow.
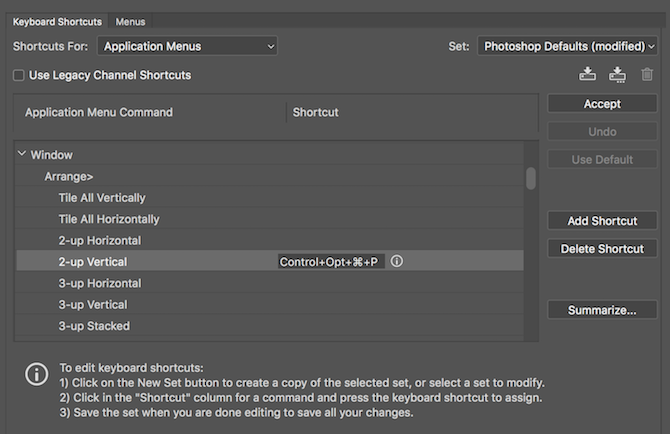
Let’s say you want to set a keyboard shortcut for toggling the 2-Up vertical view used in the fourth tip in this article:
- Go to Edit > Keyboard Shortcuts or use keyboard shortcut Option+Shift+Cmd/Ctrl+K.
- In the panel that opens up, you can set or change existing keyboard shortcuts for Application Menus, Panel Menus, and Tools.
- In the drop-down menu for Shortcuts For select Application Menus.
- Scroll down to Window and click the arrow to expand the selection and see all the items you’d find under the Window menu.
- Scroll down to the menu item you want (in this case 2-Up Vertical) and click to select.
- Enter the keyboard shortcut you want to use. If the keyboard shortcut is already in use for another feature, Photoshop will let you know.
- Click OK.
To create a custom workspace, open up all the panels you use frequently, and then go to Windows > Workspace > New Workspace to create a customized interface.
7. Hide All Photoshop Layers Except One
While we’ve shown you a few easy ways to get right to the layer you want to work with, Photoshop also offers the option to hide all layers except one. To do this, you’ll need the Layers panel open:
- If you don’t see the Layers panel to go to Windows > Layers to open it.
- Hold down the Alt/Option key and click the visibility (eye) icon next to the layer you want to keep open.
- All other layers will be toggled off with the exception of the one you clicked.
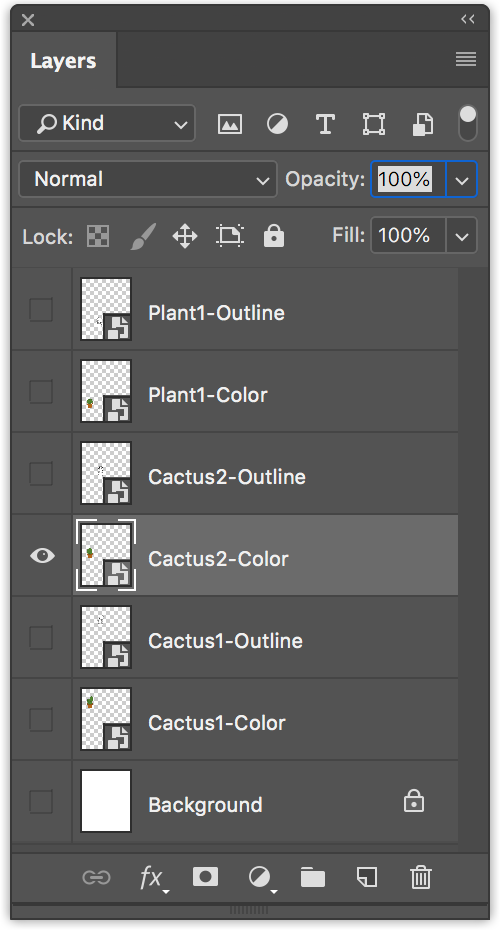
This method will also toggle off your background.
8. Organize Your Photoshop Layers
Keeping your layers organized can be a little time consuming, but in the long run, it can save you time.
Properly naming your layers makes it easier to navigate the Layers panel and to select your layers using the tips on how to quickly select a layer.
To rename a layer, open the Layers panel and find the layer you want to rename and double-click the text of the name. You can then type in the new name.
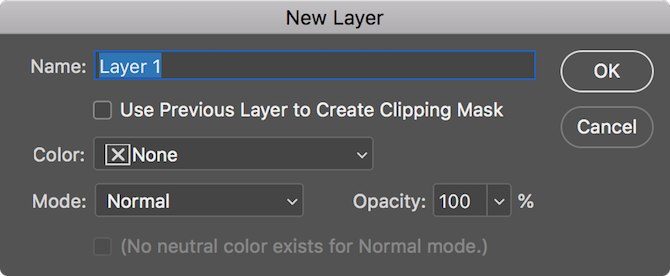
You can also name your layers as you create them by using the menu item Layer > New > Layer or use the keyboard shortcut Shift+Cmd/Ctrl+N. You can then type in the name of the layer before you create it.
To add your layers to groups, open the Layers panel:
- To select multiple layers, hold down the Ctrl/Cmd key and click the layers you want to select.
- Use the keyboard shortcut Ctrl/Cmd+G or right-click the layers and click Group from Layers.
When it comes to organizing your layers, you can use whatever approach suits your workflow best, but here are some tips if you need a hint on how to get started with keeping your layers in check:
- Group your layers by type. If you’re creating a button, for example, group all the items that make up that button: shapes, text etc. in one folder.
- Position your layers in the panel similarly to how they appear on your canvas. Place the items at the top of your design at the top of your Layers panel.
To quickly navigate between layers, you can use the following keyboard shortcuts:
- Select layer beneath selected layer: Alt/Opt+[
- Select layer above selected layer: Alt/Opt+]
- Move layer down one position: Cmd/Ctrl+[
- Move layer up one position: Cmd/Ctrl+]
Keep Speeding Up Your Photoshop Workflow
The more you use Photoshop, the more you’ll learn about speeding up your workflow. As it becomes clearer to you which features you use most often, you can search for more tips and tricks to speed up your workflow.
If you’re still getting the hang of Photoshop, these tips will come in handy, but first be sure to take a look at everything you need to know to learn the basics of Photoshop.
Read the full article: 8 Adobe Photoshop Workflow Tips to Improve Your Image Editing
from MakeUseOf https://ift.tt/2P1mNZO
via IFTTT

0 comments: