Proper spelling is not just a courtesy, it’s also a sign of intelligence and good education. And with Google Chrome, spell checking is a breeze.
These days, you don’t actually need to know how to spell to make a good impression. If you’re smart, you’ll just use one of the many free spell check tools, some of which can also correct your grammar. And by paying a little attention to the corrections these tools make, you can also improve your native spelling skills on the go.
How to Set Up Spell Checking in Google Chrome
Chrome comes with a native spell checker, which should be enabled by default. The dictionary is typically set to the language of your operating system, but you can add and switch between multiple languages. This spell checker also offers an advanced version that uses the Google search spell checking technology. This, however, involves routing your text through Google’s servers. So let’s see all the options in detail.
How to Enable Spell Check in Google Chrome
To enable or disable the spell checker in Google Chrome, follow these steps:
- Click the menu button in the top right of the browser toolbar and select Settings.
- Scroll to the bottom click Advanced to expand additional settings.
- Scroll down to Languages and click Spell check to expand the respective menu.
- Here you can turn on or off Chrome’s spell check by clicking the slider next to the respective language. A blue slider indicates that the spell checker is enabled.
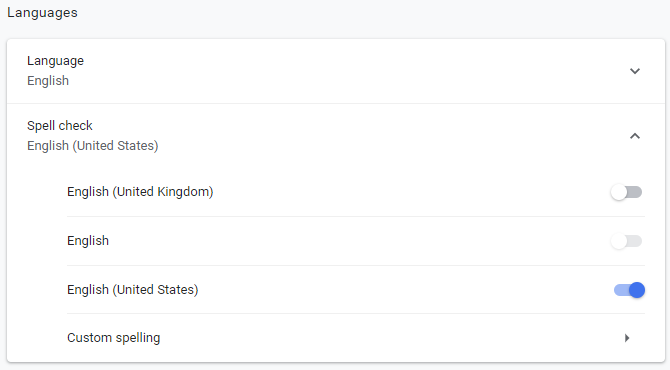
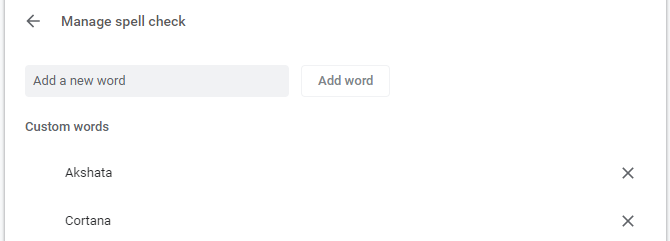
Note 1: You can add and edit custom spellings by selecting the respective option at the bottom of the list. Basically, you can add words to Google’s default dictionary, which is handy for names or technical terms that Chrome’s spell check doesn’t recognize.
Note 2: You can also enable an enhanced spell checker, which will recognize other errors, like a missing space or hyphen. In Settings > Advanced, go to Privacy and security, click Sync and Google services, and, at the bottom of the list, enable Enhanced spell check.

How to Add Additional Languages to Google Chrome’s Spell Checker
The language you want to spell check isn’t showing up in Chrome? Chrome only picks up your system’s default language for its spell checker.
Here’s how to add another language:
- Expand the Language menu and click Add languages.
- Check the language you wish to add and click Add.
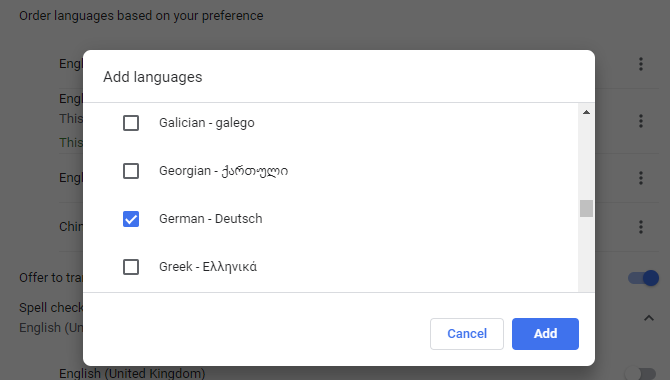
Once you’ve added a language to Chrome, go back to the spell check menu and enable the spell checker.
How to Use Google Chrome’s Spell Checker
Now that you have added languages and enabled the spell checker, the question is, how does Chrome know when to spell check and which language to use?
By default, Chrome spell checks words in all text fields, including Gmail and most third-party websites. When you misspelled a word, you should see a red squiggly line underneath that word. If you enabled the enhanced spell check, you might also see a grey squiggly line, which indicates a different error, such as a missing space.
Find the Right Spelling With Google Chrome
When you see a word that’s marked as misspelled, right-click it to review Google’s suggestion, which shows up at the top of the context menu.

Note: Be sure to enable Ask Google for suggestions, as this will give you access to advanced results. For difficult to interpret typos or words, Google will use its prediction engine to come up with better suggestions.
Add Words to Your Custom Dictionary
If Chrome is wrong about a spelling, you don’t have to go to the Settings menu to add a new word. Simply right-click the word and select Add to dictionary. Now the spell checker won’t highlight that word again.
Note: Your custom dictionary is the same, regardless of which language you select.
Manage Chrome’s Spell Checker On-the-Fly
You can turn Chrome’s spell check feature on or off anytime. At the same time, you can also change the language Chrome is using.
- Right-click into a text field and choose Spellcheck from the menu.
- In the options menu, make sure Check the spelling of text fields is selected.
- Now choose the appropriate language or simply All your languages.
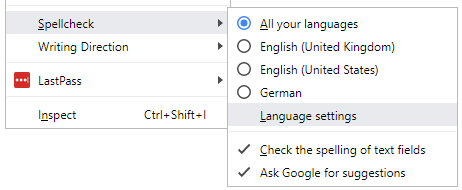
Note: Chrome might not automatically spell check long texts. With the spell checker enabled, it will, however, spell check everything you type. To process a long text, for example when opening a post in WordPress, you might have to click each paragraph to initiate Chrome’s spell check for that paragraph.
Chrome Spell Check Isn’t Working
When Chrome’s spell check isn’t working, you can try the following steps:
- Click the three-dotted menu, head to Settings, search for spell check, then disable and re-enable all settings related to spell checking.
- Disable third-party spell checkers in the Chrome extensions menu: chrome://extensions/
- Check whether Chrome is up-to-date and restart it.
Alternative Spell Checkers for Chrome
Even with all features enabled, Google’s spell checker remains somewhat basic because it doesn’t check grammar or style. Meanwhile, the Chrome Web Store is boasting with alternative spell checkers. So if you need an advanced tool, try one of the following.
1. Grammarly for Chrome
Grammarly is an AI-powered writing assistant that includes a contextual spell and grammar checker. Like Chrome’s default spell checker, it works in all text fields. Over 10 million users and a near perfect user rating make it the de facto gold standard for spell and grammar checking in your browser.
The free version catches critical grammar and spelling errors. With the premium plan you gain access to advanced features, like suggestions to enhance the vocabulary, genre-specific writing style checks, and a plagiarism detector.
Grammarly is great if English is the only language you need to proofread. Unfortunately, it does not support other languages.
Download: Grammarly (Free with optional paid plans)
2. Grammar and Spell Checker by LanguageTool
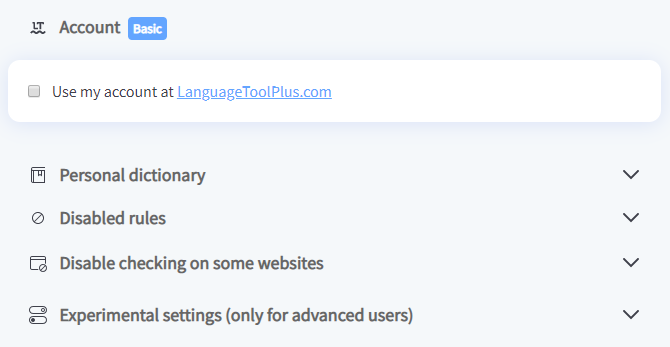
If you want to proofread content in more than one language, try this grammar and spell checker for Chrome. With almost 250 thousand users and a 4.5/5 rating, it’s one of the most-used and best-rated spell checkers for Chrome.
The free plan supports 20,000 characters per check in over 25 languages. Signing up for a Premium or Enterprise plan will add additional features and API access. You don’t need an account to use it, your IP address will not be logged, and all data transfers needed to provide the service happen over an encrypted connection.
Download: Grammar and Spell Checker (Free with optional paid plans)
How Do you Spell Check and Proofread in Chrome?
The best spell and grammar checker will always be a human, aided by technology. Technology isn’t always smart enough to understand context and may offer strange fixes. By asking Google for suggestions, however, you will get close to perfect corrections.
If you’d like to work on your English writing and grammar outside the browser, we recommend these apps:
Read the full article: The Best Ways to Spell Check in Google Chrome
from MakeUseOf http://bit.ly/2YQQAJZ
via IFTTT

0 comments: