
When you take regular backups of your Mac (which you hopefully do), you’ll eventually run into storage-related problems. After some time, you’ll run out of space on the external drive that holds your data. Or you might find that you’re paying too much for a cloud because it charges by the gigabyte. Meanwhile, a slow internet speed can make large backups slow and painful.
One approach to these problems is to reduce the total amount of data you’re backing up. We’ll show you several easy steps to cut the backup size and make sure you backup only important files on your Mac.
1. Use Optimized Storage
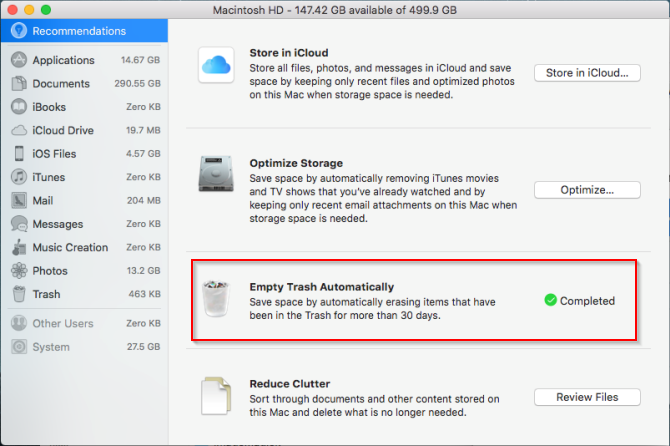
In macOS Sierra and later, the iCloud Optimized Storage feature lets you save space. It does this by storing files you seldom use in iCloud and makes them available on demand. To get started, open Apple menu > About This Mac > Storage and click Manage.
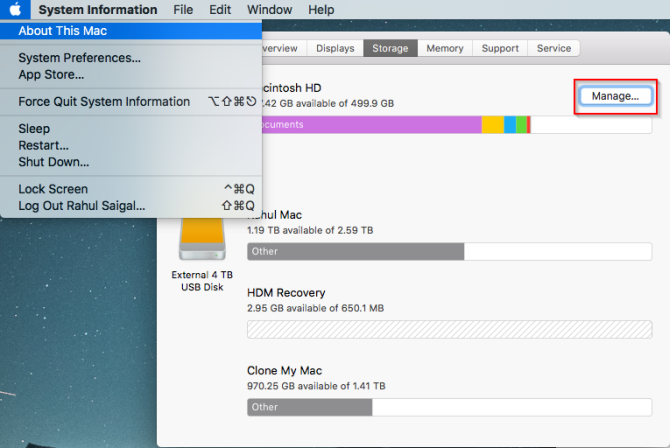
In the list on the left panel, click Recommendations and explore the four options on the right panel. We cover three of them below.
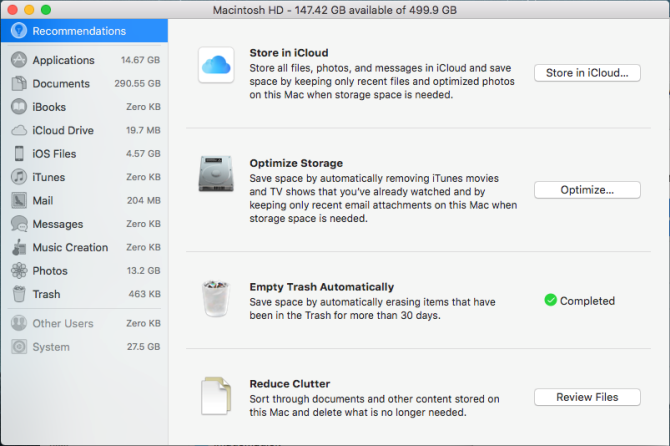
Store in iCloud
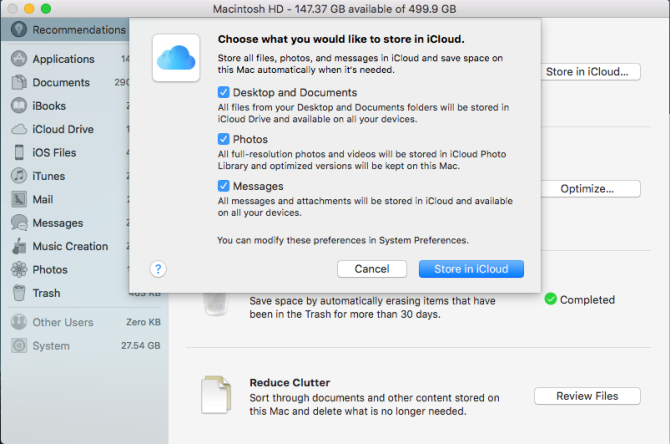
Click the Store in iCloud button to store all files, photos, and messages in iCloud and save space on your Mac automatically when needed. Check Desktop and Documents to move the data from these locations to iCloud Drive and make them available on all your devices.
Similarly, check Photos to keep full-resolution photos in iCloud Photo Library and optimized versions of those items on your Mac. Keep a note of space the items in those folders occupy to avoid any surprised with the impact on your iCloud storage space and internet data caps.
Optimize Storage
Click the Optimize button and follow the prompts to have macOS remove movies and television shows that you’ve watched. You can also tell Apple Mail to Download only recent attachments or no attachments at all. Later on, if you need those items, you can download them on demand.
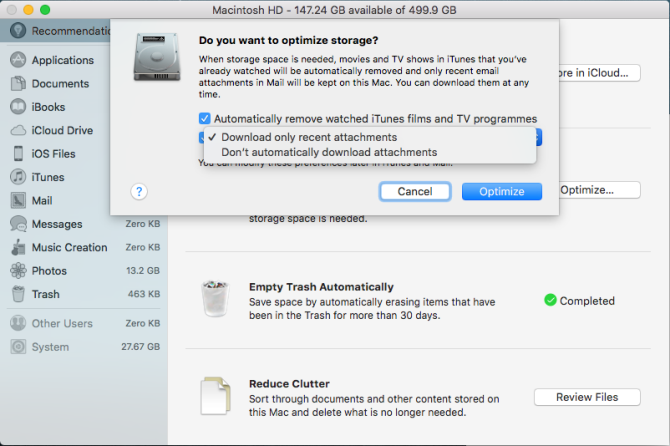
Once you enable these features, macOS will perform the necessary tasks in the background. You’ll be less likely to run out of disk space and thus significantly reduce your backup size.
Empty Trash Automatically
The Trash is just another folder residing on your Mac. Moving files or folders to the Trash doesn’t delete them. Its contents continue to take up space and could result in longer backups. Right-click on the Trash icon and choose Empty Trash to clean it out manually.
To do this automatically, enable the option here to erase items that have been in the Trash for more than 30 days.
2. Uninstall Apps You Don’t Need
If you’ve installed dozens of apps, then your backups might take longer to complete. With so many apps, it’s also hard to remember the apps you last opened. Thankfully, there’s a way to tackle this problem.
Click the Applications shortcut located on Finder’s sidebar. Right-click on the column header and check Date Last Opened. You’ll then see a date and time next to all the apps.
In list view, click View and choose Arrange By > Date Last Opened. As you do this, the apps will arrange in descending order from today backwards.
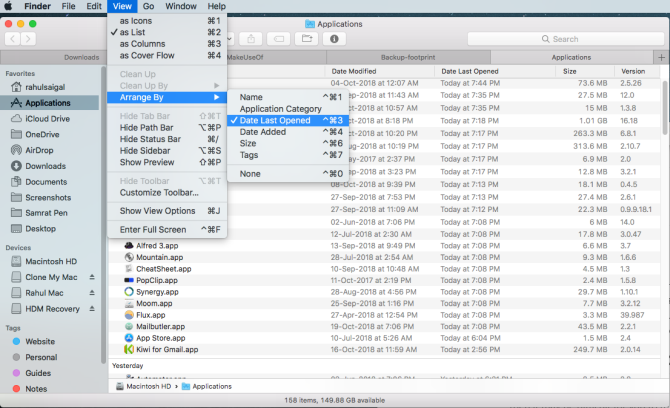
Then decide on apps you use frequently and which ones you can remove. While here, we recommend you make a list of apps installed on your Mac and keep it safe.
When you delete Mac apps by simply dragging them to the Trash, some files remain on your Mac. They consume disk space and thus affect backups. Consider using AppCleaner to remove extra files while uninstalling an app.
3. Split the Photo Library
The Photos app lets you create multiple photo libraries. You can keep separate photo libraries for independent personal and work photos, saving iCloud space, reducing backup size, and more.
To get started, quit the Photos app. Then press and hold the Option key while relaunching the app. In the Choose Library dialog, click the Create New button. Enter a library name and choose the location—preferably an external hard drive.
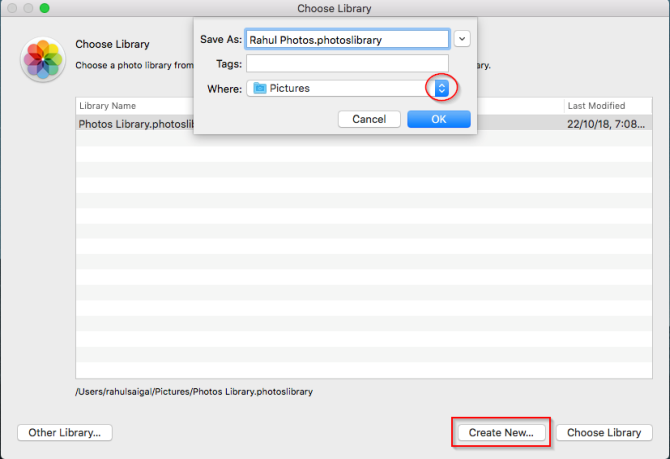
A fresh copy of Photos app will launch. Import old archives, screenshots, and photos you don’t want to keep in the main collection. To switch between libraries, quit the Photos app and hold Option while restarting it again. When you see the Choose Library dialog, select the library you just created and click the Choose Library button.
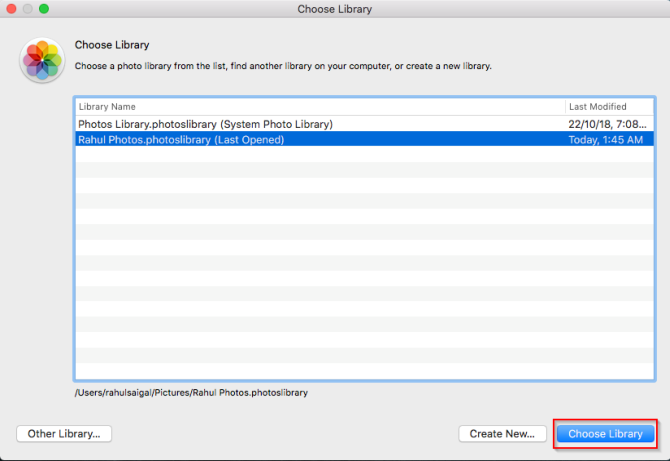
While you do get the benefit of reduced backup size, remember that Photos only lets you choose one System Photo Library. Only this library can sync with iCloud and your iOS devices. If you care about the other photo library, then consider Google Photos to back up that library.
4. Remove Duplicate Files
If you have two or more identical copies of a file on your Mac, all but one of them is a waste. With the right tools, you can quickly find and delete duplicate files that bloat your backup size.
PhotoSweeper
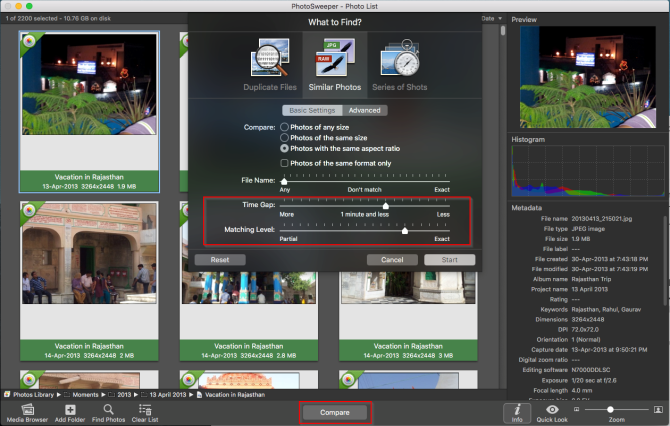
PhotoSweeper is a fast, precise, and efficient tool to remove similar or duplicate photos from your photo collection. It works with Photos, Lightroom, and even photos scattered across your hard drive. Click the Media Browser on the toolbar to add your Photos library.
Then photos from your Photos library get added to the Photo List. Now click the Compare button and select Similar Photos mode. Adjust Time Gap and Matching Level to your needs.
Download: PhotoSweeper (Free trial, $10)
Gemini 2
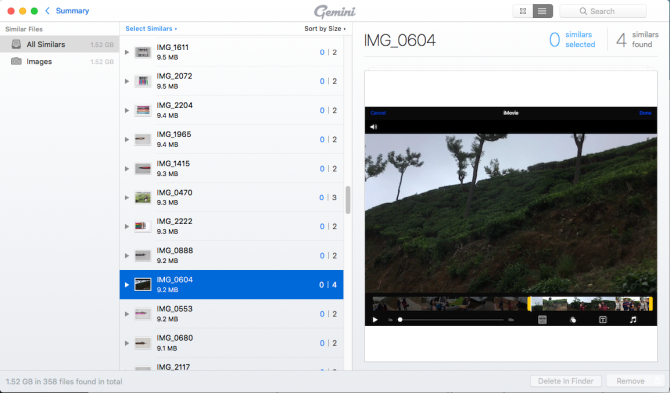
Gemini 2 helps you find duplicate and similar files on your Mac, including those on Photos, iTunes, and external drives. Its easy-to-use interface and smart selection algorithm lets you clean files in no time.
To get started, drag and drop a folder onto the window. Once the scan is complete, review the results and click Smart Cleanup. Gemini will move duplicates to the Trash.
Download: Gemini 2 (Free, $20 premium version available)
5. Clean Your Desktop and Downloads Folder
Your Desktop and Downloads folders likely contain a bunch of files. These folders quickly become unmanageable and clogs up backups slower. You’ll save space on your disk and make backups faster with these tricks and built-in tools to clean up folders.
Ask Where to Download Files
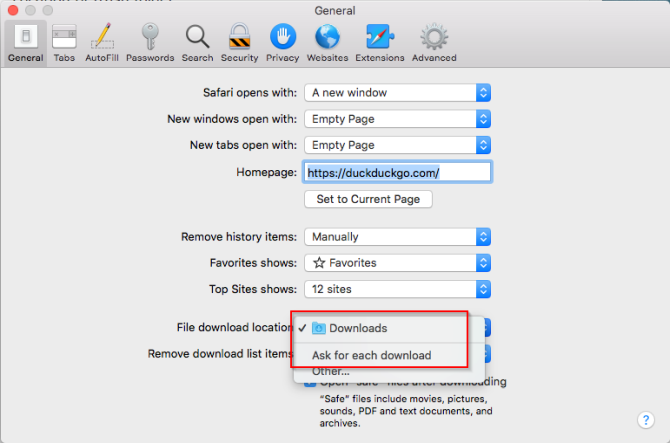
Instead of downloading files to a set location, you can set the browser to ask you where to download files every time. In Safari, go to Preferences > General > File download location and change it to Ask for each download.
While it’s a hassle to select folder every time, you can altogether avoid the navigation and save files easily with Default Folder X. This app lets you save a file to any directory with the press of a hotkey.
Keep Downloads Folder Clean
Most files stick around in your Downloads folder for some time. You can use Automator to automatically move any files older than, say, 90 days to the Trash.
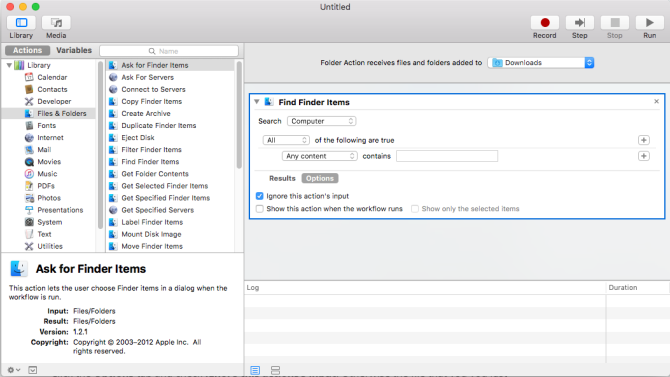
Open Automator and create a new document. Choose Folder Action.
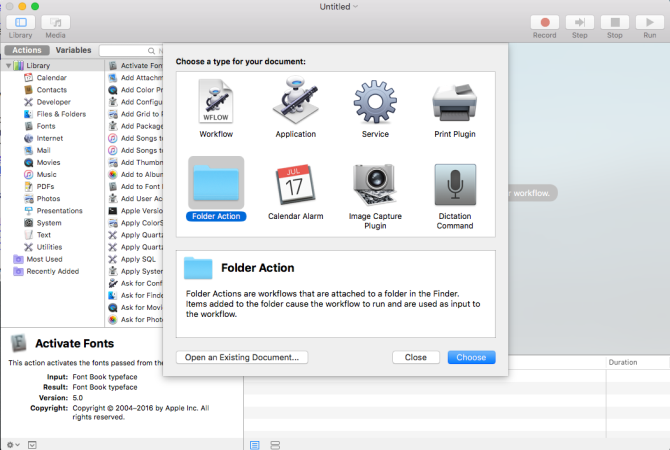
Using the Choose Folder picker, find your Downloads folder.
In the left pane, click Files and Folders, then drag the Find Finder Items action into the right pane. Click the Options tab and check Ignore this action’s input. Otherwise, the file that you just downloaded will get deleted too.
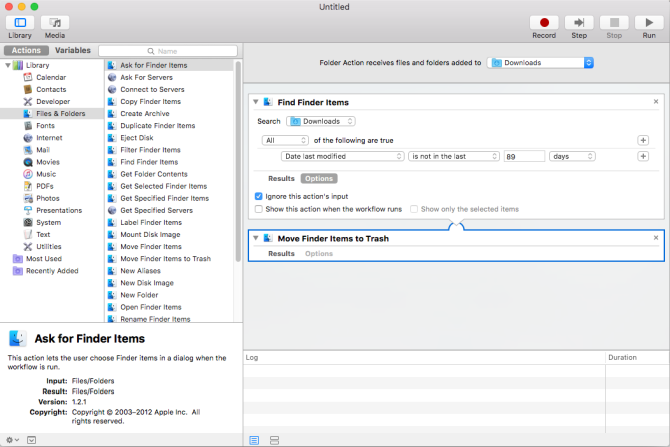
Change the Search folder to Downloads and choose a Date Last Modified range that suits you. Click back to the Results tab and click Run to ensure you see the files you want.
In the last step, drag the Move Finder Items to Trash action to the workflow. Then save the Automator action you just created and you’re all set.
Hazel: Sort and Delete Files Automatically
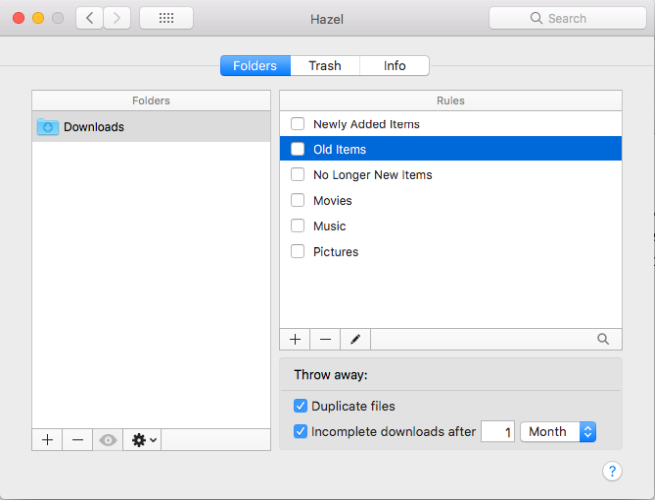
Hazel is an automation app for Mac that monitors changes in a folder, based on rules you set, and then performs a particular action. The app lets you set complex rules to sort and delete files in a single workflow.
Download: Hazel (Free trial, $32)
6. Archive Files With Cloud Storage Services
Backup and archiving serve different functions, yet you’ll often hear these words used interchangeably. Archiving lets you move files you rarely use but want to keep into secondary storage. Backup is for saving a copy of files you regularly use and don’t want to lose.
Unfortunately, most people don’t decide which files to archive instead of backing up. As a result, their backups increase in size.
If you have files suitable for archiving, you can subscribe to a service that gives you tons of storage space at a fraction of typical costs.
Backblaze B2
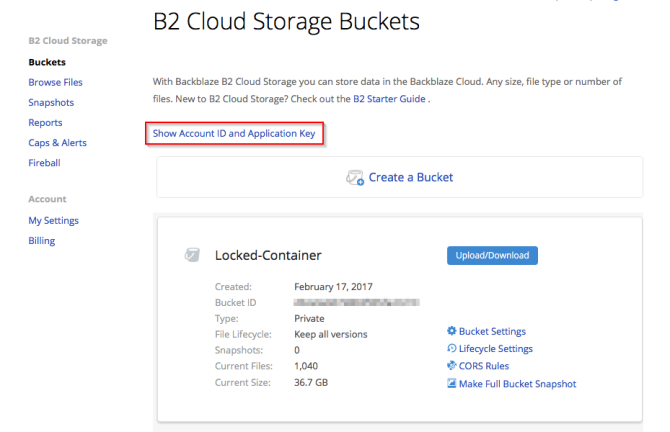
Backblaze B2 is a “cold storage” cloud service for storing files. The cost for B2 is variable based on the amount of data, bandwidth used, and transactions performed. The baseline cost of storage is $0.005 per GB per month, with the first 10GB free.
To get started, sign up for a Backblaze account. Once you enable B2 for your account, you’ll get access to Account ID and Application keys in your account settings. B2 does not include any client apps, but you can use various third-party apps that integrate with its API to upload and download data.
Amazon Glacier
Amazon Glacier is a secure, durable, and low-cost cloud storage service for data archiving and long-term backup. The baseline cost for storing data is $0.004 per gigabyte per month, with the first 10GB free. Amazon Glacier provides three options for access to archives, from a few minutes to several hours.
To get started, set up and log into your Amazon AWS account. Get the Application Keys and create a vault in Amazon Glacier. Regardless of whether you use S3 or Glacier, there are excellent third-party apps available to upload and download data through it. Some choices are CloudBerry Backup, Arq Backup, and Duplicati.
Slimmer Mac Backups, Happier Drives
Doing regular backups keeps your data safe. But if you’re not careful, you’ll run of disk space in no time. Going through these steps will keep you from having to buy a new external drive or pay for more cloud storage so soon. Plus, backups will be much faster.
And remember, you don’t have to stick with Time Machine. Check out our favorite alternate tools for backing up your Mac.
Read the full article: 6 Easy Ways to Reduce Mac Backup Sizes and Save Space
from MakeUseOf https://ift.tt/2OnFqa5
via IFTTT

0 comments: