
The default Calendar app on macOS is not as advanced or complete as third-party apps such as Fantastical and BusyCal, but it’s still good at what it does.
If you’re ready to explore this in-built calendar, our Apple Calendar tips below will show you how to get started with it.
1. Create a New Calendar
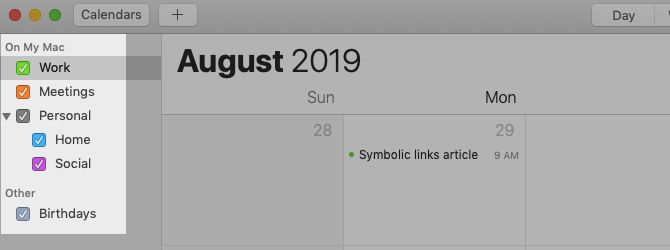
Thanks to a digital calendar, you can keep all your tasks, events, and reminders in a single location. But it’s a hassle if you can’t distinguish between these items or isolate specific ones when you need them.
You won’t have that problem with Calendar. It lets you create multiple calendars for managing schedules in different areas of your life. You can create a Home calendar for tracking household chores, a Meetings calendar to view your appointments at a glance, and so on.
Creating a new calendar is as easy as clicking on File > New Calendar. You can then rename the calendar from Calendar List in the sidebar. If that list isn’t visible, click on the Calendars toolbar button or on View > Show Calendar List to reveal it.
(The app starts you off with a couple of default calendars: Work and Birthdays.)
Calendar lets you assign a distinct color to each calendar. So it’s easy to distinguish events as personal, work-related, etc. even when you’re viewing all of them at once.
To change the color assigned to a calendar, select a color of your choice from the calendar’s right-click menu via the sidebar. (When you move an item from one calendar to another, it takes on the color of the new calendar.)
You can even bundle calendars into separate groups such as Tasks, Reminders, and Events or Personal, Work, Family, and Friends. To create a calendar group, click on File > New Calendar Group.
2. Create a New Event
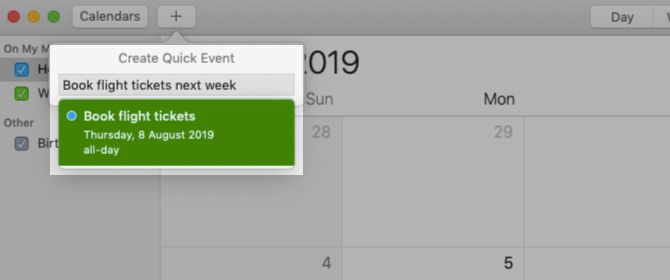
Calendar lets you add events to any calendar in multiple ways. (Be sure to select the correct calendar in the sidebar first.) For starters, you can create events with:
- The File > New Event menu item
- This keyboard shortcut: Cmd + N
- The Create Quick Event button or plus button in the toolbar
All these actions bring up the Create Quick Event popup, where you can add the event.
Here, feel free to use natural language to specify the date and time; Calendar supports that (as many other native Mac apps do.) You can trust Calendar to interpret phrases like “Karen’s birthday dinner at 8pm” or “9am flight to Mumbai on Friday” correctly and create events from them. We recommend using natural language for a faster workflow.
You can add a location, invitees, notes, URLs, etc., to the event from the Edit Event popup. To bring that up, double-click on the event in the calendar or select it and click on Edit > Edit Event.
In the popup, click on the event date to access a hidden section from where you can set up reminders or alerts for the event.
It’s a pity that Calendar reminders don’t show up in the Reminders app. But you can display them in the Notification Center with the Calendar widget.
3. Switch Calendar Views
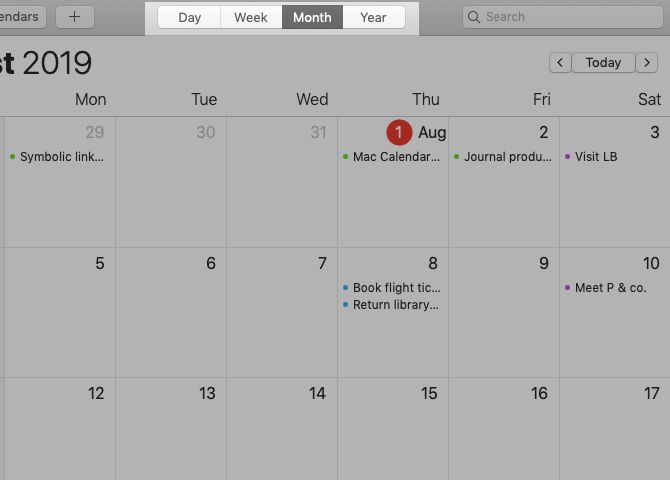
Do you want to zoom in on the tasks and events you’ve scheduled for a particular day or week? Maybe you’d like to see how busy you are all this month, or want to take in the entire year at a glance.
Such scenarios are exactly why Calendar has four unique views: Day, Week, Month, and Year. They help you visualize your schedule in multiple ways.
To switch between the calendar views, click on the relevant toolbar buttons or View menu options. You can even create events via these views. To get started, all you have to do is double-click on the relevant day in the Month view or on a time slot in the Day and Week views. These actions lead to directly to the Edit Event popup instead of the Create Quick Event popup.
4. Sync Calendar With an Online Account
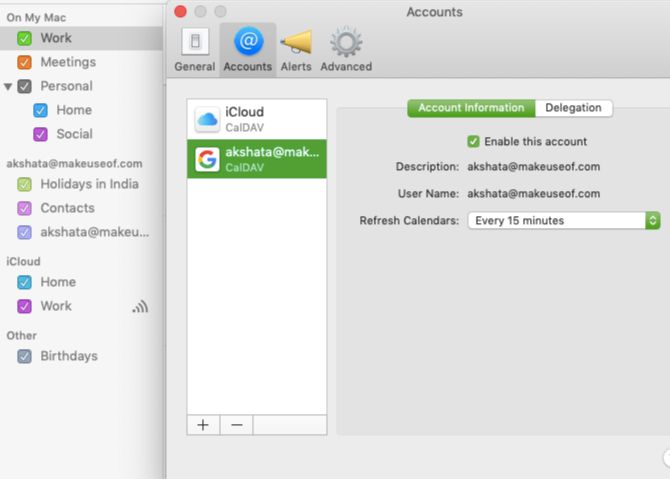
Any calendars you create in Calendar get stored on your Mac and appear under the On My Mac sidebar section. If you want to bring your iCloud calendar, Google Calendar, or any other CalDAV calendar to the Calendar app to manage them all from one location, that’s easy to do.
All you need to do is set up the appropriate calendar account under Calendar > Preferences > Accounts. (You can also delete an account or disable it temporarily from this location.)
Are you already using said online account with Mail, Notes, or other native Mac apps? In that case, you can enable calendar sync for that account via System Preferences > internet Accounts as well.
After you add an account to Calendar, you can no longer create a new calendar with the keyboard shortcut Cmd + Option + N. Instead, you have to use the File > New Calendar option, which allows you to pick the account in which to create the new calendar. Also, calendar groups are available only for the local account.
5. Share a Calendar
Sharing your schedule with people can save you a lot of back and forth while planning common activities.
For example, sharing an “availability” calendar with your best friend will help you pinpoint times when you’re both free to catch up. Or you can maintain a shared “errands” calendar to see if you can shop for groceries together. And if you add location-based items to the calendar, it becomes easy to figure out when you’ll be in the same neighborhood during the week.
In the Calendar app, you can share only the calendars linked to an internet account. In other words, you can’t share calendars listed under On My Mac.
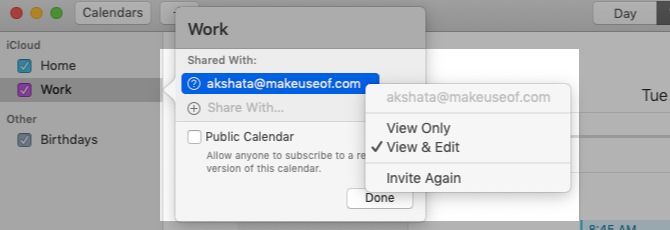
To share a calendar, hover over it and click on the Share Calendar button (wireless or connectivity icon) that appears. In the next popup, type in the name or the email address of the person with whom you want to share the calendar, then hit Enter. This sends out a calendar invite immediately.
By default, people you have shared a calendar with can view as well as edit the calendar. If you want to revoke editing privileges for specific people, click on their name in the list and select the View Only option from the popup menu. (Notice the Invite Again option in the menu. Click on that if you want to resend the invitation to the shared calendar.)
If you want to stop sharing the calendar with a specific person, select that person’s name in the Shared With list and hit the Delete button.
Don’t want to share a certain calendar at all anymore? Right-click on it in the sidebar and select Stop Sharing from the context menu.
Apple Calendar: A Great Calendar App You Already Have
Your Mac’s Calendar app is perfect if you want a reliable desktop calendar for the low price of free. It’s pleasing to look at and easy to use.
And the app can prove versatile, if you get a little creative. For instance, did you know that you can use Calendar for bullet journaling?
Read the full article: 5 Beginner Tips to Get Started With Apple Calendar on Mac
from MakeUseOf https://ift.tt/2YTTjGg
via IFTTT

0 comments: